Mazda CX-3: Rear View Monitor (Some models) / Rear View Monitor Operation
The operation of the rear view monitor when reversing the vehicle varies depending on the traffic, road, and vehicle conditions. The amount of steering and the timing also varies depending on conditions, so confirm the surrounding conditions directly with your eyes and steer the vehicle in accordance with the conditions.
Be well aware of the above cautions prior to using the rear view monitor.
NOTE
Images displayed on the monitor from the rear view parking camera are reversed images (mirror images).
- Shift the shift lever/selector lever to R to switch the display to the rear view monitor display.
- Confirming the surrounding conditions, reverse the vehicle.

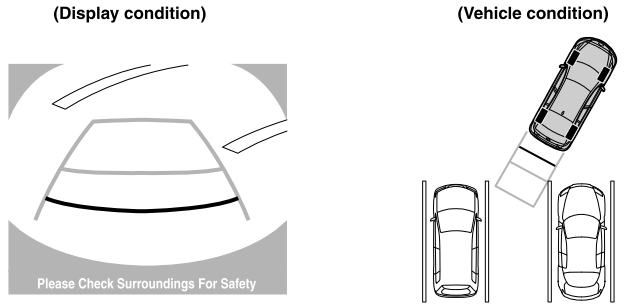
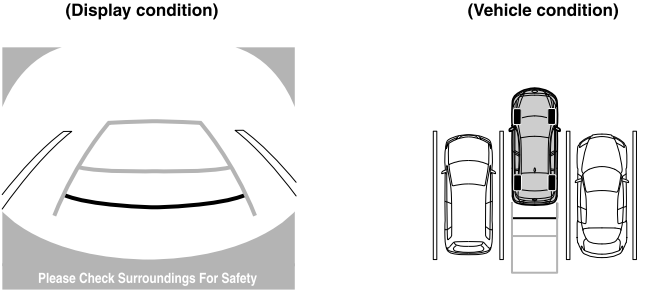
- After your vehicle begins entering the parking space, continue backing up slowly so that the distance between the vehicle width lines and the sides of the parking space on the left and right are roughly equal.
- Continue to adjust the steering wheel until the vehicle width guide lines are parallel to the left and right sides of the parking space.
- Once they are parallel, straighten the wheels and back your vehicle slowly
into the
parking space. Continue checking the vehicle's surroundings and then stop the
vehicle in
the best possible position.

- When the shift lever/selector lever is shifted from R to another shift lever/selector lever position, the screen returns to the previous display.
NOTE
- If the parking space has division lines, straighten the wheels when the vehicle width guide lines are parallel to them.
- Because there may be a difference between the displayed image,
such as indicated
below, and the actual conditions when parking, always verify the safety at
the rear of
the vehicle and the surrounding area directly with your eyes.
- In the image of the parking space (or garage) displayed on the screen, the back end and distance guide lines may appear aligned in the monitor, but they may not actually be aligned on the ground.
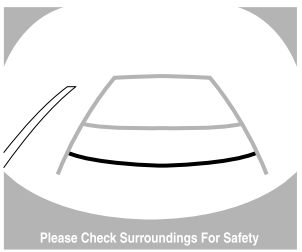
- When parking in a space with a division line on only one side of the parking space, the division line and the vehicle width guide line appear aligned in the monitor, but they may not actually be aligned on the ground.

 Viewing the Display
Guide lines which indicate the width of the vehicle (yellow) are displayed on
the screen as a
reference to the approximate width of the vehicle in comparison to the width of
the parking
space you are about to back into...
 Variance Between Actual Road Conditions and Displayed Image
Some variance occurs between the actual road and the displayed road. Such
variance in
distance perspective could lead to an accident. Note the following conditions
that may cause
a variance in distance perspective...
Other information:
Mazda CX-3 (2015-2026) Owner's Manual: Tilt/Slide Operation
The moonroof can be opened or closed electrically only when the ignition is switched ON. Before leaving the vehicle or washing your Mazda, make sure the moonroof is completely closed so that water does not get inside the cabin area. After washing your Mazda or after it rains, wipe the water off the moonroof before operating it to avoid water penetration which could cause rust and water damage to your headliner...
Mazda CX-3 (2015-2026) Owner's Manual: Odometer, Trip Meter, Trip Computer and Trip Meter Selector (Some models)
The display mode can be changed between trip meter A and trip meter B by pressing the selector while one of them is displayed. The selected mode will be displayed. NOTE When the ignition is switched to ACC or off, the odometer or trip meters cannot be displayed, however, pressing the selector can inadvertently switch the trip meters or reset them during an approximate ten-minute period in the following cases: After the ignition is switched to off from ON...
Categories
- Manuals Home
- Mazda CX-3 Owners Manual
- Mazda CX-3 Service Manual
- Interior Equipment (View A)
- Auto Lock/Unlock Function
- Daytime Running Lights
- New on site
- Most important about car
Fuel Gauge
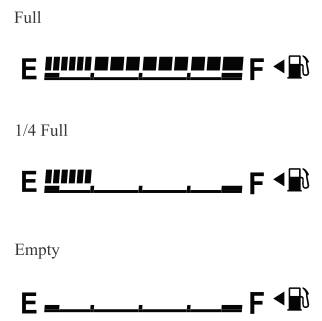
The fuel gauge shows approximately how much fuel is remaining in the tank when the ignition is switched ON. We recommend keeping the tank over 1/4 full.

If the low fuel warning light illuminates or the fuel level is very low, refuel as soon as possible.
If inconsistency in engine performance or stalling occurs due to low fuel level conditions, refuel the vehicle as soon as possible and add at least 10 L (2.7 US gal, 2.2 Imp gal) of fuel. Refer to Taking Action.
