Mazda CX-3: Light Bulbs / Replacing Exterior Light Bulbs
Headlights (With LED headlights)
The LED bulb cannot be replaced as a single unit because it is an integrated unit. The LED bulb has to be replaced with the unit. We recommend an Authorized Mazda Dealer when the replacement is necessary.
Headlights/Daytime running lights (With halogen headlights)
High-beams bulbs/Daytime running lights
- Make sure the ignition is switched off, and the headlight switch is off.
- Lift the hood.
- Disconnect the connector from the unit
by pressing the tab on the connector
with your finger and pulling the
connector downward.
- Turn the socket and bulb assembly to
remove it. Carefully remove the bulb
from its socket in the reflector by gently pulling it straight backward out
of the socket.
- Install the new bulb in the reverse order of the removal procedure.
Low-beam bulbs
- Make sure the ignition is switched off, and the headlight switch is off.
- Lift the hood.
- Disconnect the connector from the unit
by pressing the tab on the connector
with your finger and pulling the
connector downward.
- Turn the socket and bulb assembly to
remove it. Carefully remove the bulb
from its socket in the reflector by gently pulling it straight backward out
of the socket.
- Install the new bulb in the reverse order of the removal procedure.
Parking lights/Daytime running lights/Front side-marker lights (With LED headlights)
The LED bulb cannot be replaced as a single unit because it is an integrated unit. The LED bulb has to be replaced with the unit. We recommend an Authorized Mazda Dealer when the replacement is necessary.
Parking lights/Front side-marker lights (With halogen headlights)
- Make sure the ignition is switched off, and the headlight switch is off.
- Turn the socket and bulb assembly counterclockwise and remove it.
- Disconnect the bulb from the socket.
- Install the new bulb in the reverse order of the removal procedure.
Front turn signal lights
- Make sure the ignition is switched off, and the headlight switch is off.
- Turn the screw counterclockwise and
remove it, and then partially peel back
the mudguard.
- Turn the socket and bulb assembly counterclockwise and remove it.
- Disconnect the bulb from the socket.
- Install the new bulb in the reverse order of the removal procedure.
Fog lights*, Side turn signal lights*, Brake lights/Taillights (LED type), Rear side-marker lights (LED type),Taillights (LED type)*, High-mount brake light, Reverse lights (LED type)
The LED bulb cannot be replaced as a single unit because it is an integrated unit. The LED bulb has to be replaced with the unit. We recommend an Authorized Mazda Dealer when the replacement is necessary.
Rear turn signal lights, Brake lights/ Taillights (Bulb type), Rear side-marker lights (Bulb type)
- Make sure the ignition is switched off, and the headlight switch is off.
- Turn the bolts counterclockwise and
remove them.
- Pull the unit rearward to remove it.
- Turn the socket and bulb assembly counterclockwise and remove it.
- Disconnect the bulb from the socket.
Rear turn signal lights
Brake lights/Taillights
Rear side-marker lights
- Install the new bulb in the reverse order of the removal procedure.
Reverse lights (Bulb type)
- Make sure the ignition is switched off, and the headlight switch is off.
- Remove the cover.

- Turn the socket and bulb assembly counterclockwise and remove it.
- Disconnect the bulb from the socket.
- Install the new bulb in the reverse order of the removal procedure.
License plate lights
- Make sure the ignition is switched off, and the headlight switch is off.
- Remove the cover.
- Turn the socket and bulb assembly
counterclockwise and remove it.
- Disconnect the bulb from the socket.
- Install the new bulb in the reverse order of the removal procedure.
 Light Bulbs
WARNING
Never touch the glass portion of a halogen
bulb with your bare hands and always
wear eye protection when handling or
working around the bulbs: When a halogen bulb breaks, it is
dangerous...
 Replacing Interior Light Bulbs
Overhead lights (Front)/Map lights, Overhead lights (Rear)
Wrap a small flathead screwdriver with
a soft cloth to prevent damage to the
lens, and then remove the lens by
carefully prying on the edge of the lens
with the flathead screwdriver...
Other information:
Mazda CX-3 (2015-2026) Owner's Manual: Seat Belt Precautions
Seat belts help to decrease the possibility of severe injury during accidents and sudden stops. Mazda recommends that the driver and all passengers always wear seat belts. (Except Mexico) All of the seat belt retractors are designed to keep the lap/shoulder belts out of the way when not in use...
Mazda CX-3 (2015-2026) Owner's Manual: Emission Control System
This vehicle is equipped with an emission control system (the catalytic converter is part of this system) that enables the vehicle to comply with existing exhaust emissions requirements. WARNING Never park over or near anything flammable: Parking over or near anything flammable, such as dry grass, is dangerous...
Categories
- Manuals Home
- Mazda CX-3 Owners Manual
- Mazda CX-3 Service Manual
- Mazda Radar Cruise Control with Stop & Go function (MRCC with Stop & Go function) Display Indication
- Specifications
- Identification Numbers
- New on site
- Most important about car
Fuel Gauge
The fuel gauge shows approximately how much fuel is remaining in the tank when the ignition is switched ON. We recommend keeping the tank over 1/4 full.
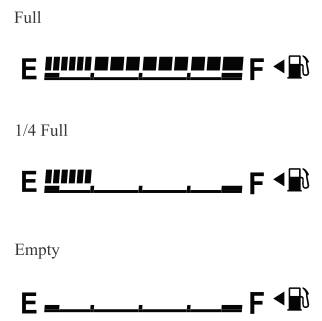
If the low fuel warning light illuminates or the fuel level is very low, refuel as soon as possible.
If inconsistency in engine performance or stalling occurs due to low fuel level conditions, refuel the vehicle as soon as possible and add at least 10 L (2.7 US gal, 2.2 Imp gal) of fuel. Refer to Taking Action.